
This post is is a guide on how to create a MySQL cluster on Ubuntu 12.04 LTS server distribution. I will not go trough basic Ubuntu installation as that can be expected a pre-requisite when creating an MySQL cluster. I will try to cover every aspect of the installation process and touch some parts regarding testing. There is another excellent guide behind the following link which has pretty much the same information and helped me get trough the installation process (LINK).
The cluster can as easily be build on physical hardware as well as on an virtual environment. Obviously if you do it on an virtual enviroment you can create snapshots of the VM’s themselves to minimize the damage if something goes wrong.
Edit 6.10.2013
Please do note that MySQL clusters have set limitations compared to one server MySQL configuration. Before venturing on with creating a MySQL cluster, do check the following page here. Personally I would recommend creating a PostgreSQL cluster.
1. SQL Cluster VM’s
To create a fully functional cluster you need a minimum of 3 VM’s to complete. One Virtual Machine to act as the cluster management and two database nodes. In case one of the DB-nodes goes offline, the cluster can still work and will synchronize once the node is back up. The Management node can also be inaccessible but will most likely case a “Split-Brain” issue with inconsistent data between the two working DB-nodes. In my example I will include a second management node to the cluster to give you an example on how it will work.
In this tutorial I will walk you trough installing a total of 5 VM’s, where two of which as Management Nodes, two are DB nodes and one is a MySQL proxy. It is possible to add additional nodes to the cluster later on and the single MySQL-proxy is possible to make Highly Avaiable (HA), but not covered in this post.
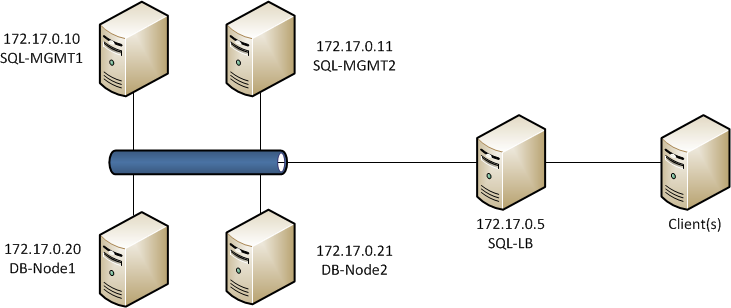
All virtual machines are in the same 172.17.0.0/24 network, but the load-balancer could as well have a connection to the outside network. This will vary from your network configuration and should be treated as a simple example network. Before you continue, you should have all VM’s working and have at least local network connectivity working.
2. Installing the management nodes
First off we need to install the management nodes of the MySQL cluster. We will start off with SQL-MGMT-1 and once it is completed, the procedure should be carried out on the second management host. If you prefer to have only one management VM, just leave it out of the configuration and you are clear to go.
Before you continue, go to http://www.mysql.com/downloads/cluster/#downloads and verify which version is the current one. This guide has been made for MySQL cluster version 7.2.10 and might vary for later versions. Change your download links accordingly!
First we want to download the MySQL cluster packages to the management host to a good location. Navigate to /usr/src directrory and create mysql-mgm directory.
mkdir /usr/src/mysql-mgm
cd /usr/src/mysql-mgm
After that is done, download the latest source from the mysql download site and extract the package.
wget http://cdn.mysql.com/Downloads/MySQL-Cluster-7.2/mysql-cluster-gpl-7.2.10-linux2.6-x86_64.tar.gz
tar xvfz mysql-cluster-gpl-7.2.10-linux2.6-x86_64.tar.gz
Navigate to the extracted folder and move the binaries.
cd mysql-cluster-gpl-7.2.10-linux2.6-x86_64
cp bin/ndb_mgm /usr/bin
cp bin/ndb_mgmd /usr/bin
Change the permissions for the directory and optionally remove the downloaded source.
chmod 755 /usr/bin/ndb_mg*
cd /usr/src
rm -rf /usr/src/mysql-mgm
Next, we must create the cluster configuration file in /var/lib/mysql-cluster/ named config.ini
The folder doesn’t exist so you need to create it:
mkdir /var/lib/mysql-cluster
After which a config.ini file can be created with your favourite text editor.
[NDBD DEFAULT]

NoOfReplicas=2
DataMemory=80M
IndexMemory=18M
[MYSQLD DEFAULT]

[NDB_MGMD DEFAULT]
DataDir=/var/lib/mysql-cluster
[TCP DEFAULT]

# Section for the cluster management node
[NDB_MGMD]
NodeId=1
# IP address of the first management node (this system)
HostName=172.17.0.10

[NDB_MGMD]
NodeId=2
#IP address of the second management node
HostName=172.17.0.11

# Section for the storage nodes
[NDBD]
# IP address of the first storage node
HostName=172.17.0.20
DataDir= /var/lib/mysql-cluster
[NDBD]
# IP address of the second storage node
HostName=172.17.0.21
DataDir=/var/lib/mysql-cluster
# one [MYSQLD] per storage node
[MYSQLD]
[MYSQLD]
Note that all hosts are defined at this stage, even though we are only installing the first one. Note that the management host nodes need the NodeID specifed where as the NDBD nodes do not.
!Note! If you copy the lines directly, the doubble hypen "--" won't work, you need to type it out
Once this is done you can start the management node with the following command:
ndb_mgmd -f /var/lib/mysql-cluster/config.ini -–configdir=/var/lib/mysql-cluster/
Once that is done, you can automate the start procedure by entering an entry to the init.d with the following commands:
echo ”ndb_mgmd -f /var/lib/mysql-cluster/config.ini --configdir=/var/lib/mysql-cluster/” > /etc/init.d/ndb_mgmd
chmod 755 /etc/init.d/ndb_mgmd
Once everything is working, follow the same procedure on the second management node and use the same configuration. You mustn’t change the node ID’s in the configuration file!
You can verify that both management nodes are operational by entering ndb_mgm (just enter ndb_mgm in terminal) and by typing show once in the configuration utility. At this point both ndbd nodes and mysql nodes are disconnected.
3. The database nodes
Creating the DB nodes is fairly simliar to creating the management nodes. First off lets start by creating a mysql group and adding a user to it.
groupadd mysql
useradd -g mysql mysql
Navigate to /usr/local and download the same compressed file as to the management nodes and extract it.
cd /usr/local/
wget http://cdn.mysql.com/Downloads/MySQL-Cluster-7.2/mysql-cluster-gpl-7.2.10-linux2.6-x86_64.tar.gz
tar xvfz mysql-cluster-gpl-7.2.10-linux2.6-x86_64.tar.gz
Create a symbolic link named mysql pointing to the extracted folder (this will be later used by the DB cluster so do not delete it!). Once the symlink is complete you can install the database.
ln -s mysql-cluster-gpl-7.2.10-linux2.6-x86_64 mysql
cd mysql
scripts/mysql_install_db -–user=mysql
Change the owner to the newly created mysql group
chown -R root:mysql .
chown -R mysql data
Like on the management nodes, we want the databae engine to start automatically and thus we need to create the command to init.d.
cp support-files/mysql.server /etc/init.d/
chmod 755 /etc/init.d/mysql.server
Lastly copy the bin files to the /usr/bin location to keep everything neat and create a symlink to keep references right.
cd /usr/local/mysql/bin
mv * /usr/bin
cd ../
rm -fr /usr/local/mysql/bin
ln -s /usr/bin /usr/local/mysql/bin
The MySQL configuration file is missing at first so we need to create it ourselves. The file is located in /etc/ and is named my.cnf. Open your favorite texteditor and add the following lines to it:
[mysqld]
ndbcluster
# IP address of the cluster management node
ndb-connectstring=172.17.0.10,172.17.0.11
[mysql_cluster]
# IP address of the cluster management node
ndb-connectstring=172.17.0.10,172.17.0.11
Note that both management nodes are entered, seperated by a comma. If you only have one management node, just remove the second one in the list. Once my.cnf file has been saved we need to create the data folders for MySQL.
mkdir /var/lib/mysql-cluster
Once that is done, we just need to initialize the cluster and start the service. The initialization needs to be done only when you start the node for the first time, or when /var/lib/mysql-cluster/config.ini file has been changed on the management node(s).
cd /var/lib/mysql-cluster
ndbd –initial
/etc/init.d/mysql.server start
After this, secure the MySQL installation by running the appropriate script:
./bin/mysql_secure_installation
And lastly we need ndb to start automatically:
echo ”ndbd” > /etc/init.d/ndbd
chmod 755 /etc/init.d/ndbd
Once everything is done, you’ve completed the first node. Follow the steps on the second database node to get it up and running.
4. Testing and Verification
Once everything is completed it’s time to verify our configuration to see that everything is working as intended. To do this, we need to verify that all nodes are visible and connected one one of the management nodes. Open the ndb management shell by typing ndb_mgm in terminal and type show. This time you should see that the database nodes have been populated in the output.
root@SQL-MGMT-Node1:~# ndb_mgm
-- NDB Cluster -- Management Client --
ndb_mgm> show
Connected to Management Server at: localhost:1186
Cluster Configuration
---------------------
[ndbd(NDB)] 2 node(s)
id=3 @172.17.0.20 (mysql-5.5.29 ndb-7.2.10, Nodegroup: 0, Master)
id=4 @172.17.0.21 (mysql-5.5.29 ndb-7.2.10, Nodegroup: 0)

[ndb_mgmd(MGM)] 2 node(s)
id=1 @172.17.0.10 (mysql-5.5.29 ndb-7.2.10)
id=2 @172.17.0.11 (mysql-5.5.29 ndb-7.2.10)

[mysqld(API)] 2 node(s)
id=5 @172.17.0.21 (mysql-5.5.29 ndb-7.2.10)
id=6 @172.17.0.20 (mysql-5.5.29 ndb-7.2.10)
ndb_mgm>
If you see a similar output, you are clear to go and try out some basic SQL commands. Move to the first DB node in the cluster. Log in to the SQL database and create a new database, table to verify replication. Note that when creating a database, the engine for the tables has to be NDBCLUSTER. If you use InnoDB for example, the data will NOT be replicated between the cluster nodes. There are some drawbacks when using ndbcluster as your engine, which can be found in the MySQL website.
http://dev.mysql.com/doc/refman/5.5/en/mysql-cluster-limitations-unsupported.html
http://dev.mysql.com/doc/refman/5.5/en/mysql-cluster-limitations-syntax.html
mysql -u root -p
CREATE DATABASE mysqlclustertest;
USE mysqlclustertest;
CREATE TABLE testtable (i INT) ENGINE=NDBCLUSTER;
INSERT INTO testtable () VALUES (1);
SELECT * FROM testtable;
Connect to the second database node and lets see if we get the same output.
mysql -u root -p
USE mysqlclustertest;
SELECT * FROM testtable;
You should see the same output as on the first node when doing the select statement. Now if you insert a new entry to the table, it will be replicated back to the first node.
For additional testing please see this guide section 5 here.
5. Loadbalancer
The last part in our guide is to install the load-balancer to get some additional use of the MySQL-cluster. The loadbalancer can be something else than the mysql-proxy, but this is easy and simple to install and does it’s job. You could use something like pFsense if you’d like to.
root@mysql-proxy:~# apt-get install mysql-proxy
root@mysql-proxy:~# mkdir /etc/mysql-proxy
root@mysql-proxy:~# cd /etc/mysql-proxy
root@mysql-proxy:/etc/mysql-proxy# nano mysql-proxy.conf
And add the following to your mysql-proxy.conf
[mysql-proxy]
daemon = true
proxy-address = 172.17.0.5:3306
proxy-skip-profiling = true
keepalive = true
event-threads = 50
pid-file = /var/run/mysql-proxy.pid
log-file = /var/log/mysql-proxy.log
log-level = debug
proxy-backend-addresses = 172.17.0.20:3306,172.17.0.21:3306
proxy-lua-script=/usr/lib/mysql-proxy/lua/proxy/balance.lua
For automatic start with additional options create the following file /etc/default/mysql-proxy
ENABLED="true"
OPTIONS="--defaults-file=/etc/mysql-proxy.conf --plugins=proxy"
After that you can start the mysql-proxy by invoking the following command: /etc/init.d/mysql-proxy start/stop/status
Once this is completed, you should be able to connect to the MySQL servers using the proxy address. Do remember that for this to work, you will need to create a new user that has a specific subnet allowed to connect to it. You will also need to add to the my.cnf file the bind-address for the MySQL servers.
SQL users do not replicate, so the same user has to be added to all database nodes individually. Once logged in to the DB node SQL shell, execute the following command:
CREATE USER 'newuser'@'172.17.0.%' IDENTIFIED BY 'password';
FLUSH PRIVILEGES;
SELECT * FROM mysql.user;
Change newuser, ip and password as per your configuration needs. The % in the IP-address acts as a wildcard and thus the whole subnet it allowed to connect remotely to this DB node. Remember to flush privileges after the user has been added. Remember to add the same user with same configuration to all other Database nodes in this cluster.
Hello, I’m following your setup in my VMs, clustering is working OK but my load balancer crashes:
user@SQL-LB:~$ sudo /etc/init.d/mysql-proxy start
* Starting MySQL Proxy daemon… [ OK ]
user@SQL-LB:~$ sudo /etc/init.d/mysql-proxy status
* Checking MySQL Proxy daemon… * mysql-proxy is not running
The config file is identical as yours, but It doesn’t write any log to help me.
I installed it in a five MV. The IPs, ports and config files are everyone ok, so I don’t know where the problem is.
Please, could you help me.
Thanks for your great job.
You could try to see the log files from the MySQL-Proxy by giving it a log-level definition during star-up.
http://dev.mysql.com/doc/refman/5.1/en/mysql-proxy-configuration.html#option_mysql-proxy_log-level
Set log-level=debug in your mysql-proxy configuration file to get everything. This should help you get some additional information on why the load balancer refuses to start.
Hello, I’m trying to do your tutorial but I have a problem on mysql-proxy.
This is my mysql-proxy.conf :
[mysql-proxy]
plugins=proxy,admin
daemon = true
proxy-address = 192.168.52.205:3306
proxy-skip-profiling = true
keepalive = true
event-threads = 50
pid-file = /var/run/mysql-proxy.pid
log-file = /var/log/mysql-proxy.log
log-level = debug
proxy-backend-addresses = 192.168.52.203:3306
proxy-read-only-backend-addresses = 192.168.52.203:3306,192.168.52.204:3306
proxy-lua-script=/usr/lib/mysql-proxy/lua/proxy/balance.lua
admin-username=root
admin-password=amasselin
admin-lua-script=/usr/lib/mysql-proxy/lua/admin.lua
When i do this : /etc/init.d/mysql-proxy start
I have this error in log :
Jul 12 23:34:10 ubuntu-server kernel: [ 2002.433072] mysql-proxy[2148]: segfault at 8 ip 00000000004025db sp 00007fff1c2b3270 error 4 in mysql-proxy[400000+4000]
I don’t know where is my error, do have any idea ?
Thank you
Best regards,
Arnaud Masselin
Hey,
With a quick search it would seem like a memory fault on your system. If you are running the server on a physical machine, you could try to run memcheck on it.If it’s a VM, then this page should be of help: http://www.cyberciti.biz/tips/segmentation-fault-on-linux-unix.html
Hi,
First, thanks for this nice article!
I’d like to install a cluster with 2 nodes and only one management server.
When I try to start mysql one each node, I’ve an error:
/etc/init.d/mysql.server start
Starting MySQL
[FAIL..] The server quit without updating PID file (/usr/local/mysql/data/mynode02.pid). … failed!
What am I doing wrong?
Thanks for your help.
Christophe
Hi,
When you get an error like that, always first check the mysql error log file regarding the reason for that error. Please check there first to see what the reason behind that was. It could be as simple as a typo in the configuration file.
Hi,
In my config (my.cnf) file in each node is simply (192.168.0.131 is the address of the management node) :
— CONFIG —
[mysqld]
ndbcluster
ndb-connectstring=192.168.0.131
[mysql_cluster]
ndb-connectstring=192.168.0.131
— CONFIG —
I created a new VM to test but I still have the same problem :-(
What could I check?
Without log files it’s really hard to work on the issue. You could try to start the mysql service with the –verbose switch to see if there is any additional information that could help with the issue.
Hi,
I went to the same problem as Sergio.
I use exact the same setting as your, except that in /etc/default/mysql-proxy
ENABLED=”true”
OPTIONS=”–defaults-file=/etc/mysql-proxy/mysql-proxy.conf –plugins=proxy”
I thought this may be typos error from your post?
Anyway, MySQL Proxy daemon can not start and no log is generated with, even with debug level.
I have also tried the configuration file as Arnaud Masselin, but no luck.
Any idea?
Just an update. After specify the admin-* parameters in the mysql-proxy.conf, now it shows some error in syslog, almost the same as Arnaud Masselin got.
ubuntu kernel: [62219.496215] mysql-proxy[2971]: segfault at 8 ip 00000000004025db sp 00007fffb1340180 error 4 in mysql-proxy[400000+4000]
I do install mysql-proxy in VM, powered by KVM in Ubuntu 12.04, the VM OS is also 12.04. Follow the link you provide to Arnaud Masselin I did not find any useful information that is related to VM. Also there is few information I can found from google. Cloud you please give me some help.
Thanks in advance.
Best regards,
shedoh
Hi,
I finally got it work. There are two parts which might cause the problem. The first is time sync and the second is the mysql-proxy.conf itself. I make it work with the following settings (admin-* and plugins looks necessary):
daemon = true
keepalive = true
event-threads = 50
pid-file = /var/run/mysql-proxy.pid
log-file = /var/log/mysql-proxy.log
log-level = debug
plugins=proxy,admin
proxy-address = 10.228.91.247:3306
proxy-skip-profiling = true
proxy-backend-addresses = 10.228.91.249:3306,10.228.91.248:3306
proxy-lua-script=/usr/lib/mysql-proxy/lua/proxy/balance.lua
admin-username=root
admin-password=password
admin-lua-script=/usr/lib/mysql-proxy/lua/admin.lua
Good to hear that you got it to work! Haven’t had time to go back to my configuration, I will definitely check this out as soon as I find the time for it.
I don’t usually comment, but this guide was quite helpful.
There are three issues, there is a typo on these lines
ndb_mgmd -f /var/lib/mysql-cluster/config.ini -–configdir=/var/lib/mysql-cluster/
and
scripts/mysql_install_db -–user=mysql
The double hypen doesn’t work when you copy and paste, you will need to change it manually.
Secondly, mysql-proxy.conf has been created in the /etc/mysql-config/ dir, but in the default/mysql-cofig file, it refers to the wrong place
OPTIONS=”–defaults-file=/etc/mysql-proxy.conf –plugins=proxy”
Lastly, the file permission for the mysql-config.conf file needs to be 660 otherwise mysql-proxy will crash without generating a log, this would solve some of problems in the previous comments.
Thank you for the feedback and sorry for a late reply. I’ve updated the post with your input :)
Hello , my name es Oscar
I would like to ask if you can upload a video explaining this tutorial
I greatly appreciate
salutations
Thank you! For the time being i’m a bit too busy to think of working on video tutorials. Perhaps later on :)
Thank you for the article, I use a 32-bit Ubuntu 12.04 Server, i configuration in accordance with this article, I first started the management node, and then start the data nodes, data nodes tips
2013-11-17 21:34:36 [ndbd] INFO — Angel connected to ‘192.168.67.10:1186’
2013-11-17 21:34:36 [ndbd] INFO — Angel allocated nodeid: 4
Then I managed node when using the show command to view, generates an error:
ndb_mgm> show
Cluster Configuration
———————
[ndbd(NDB)] 2 node(s)
id=3 (not connected, accepting connect from 192.168.67.13)
id=4 (not connected, accepting connect from 192.168.67.14)
[ndb_mgmd(MGM)] 1 node(s)
id=1 @192.168.67.10 (mysql-5.6.11 ndb-7.3.2)
[mysqld(API)] 2 node(s)
id=5 (not connected, accepting connect from any host)
id=6 (not connected, accepting connect from any host)
ndb_mgm> Node 4: Forced node shutdown completed. Occured during startphase 0. Initiated by signal 9.
How can I fix it? Thank you.
Would seem that you have insufficient amount of ram on the server.
Thank you, the problem has been resolved.
hi!
after executing the command:
sudo ndb_mgmd -f /var/lib/mysql-cluster/config.ini -–configdir=/var/lib/mysql-cluster/
i got this error:
/usr/bin/ndb_mgmd: 1: /usr/bin/ndb_mgmd: Syntax error: “(” unexpected
Could you help me?
regards,
Alexandre
It could be that you downloaded a x64 version binary and try to run it on a x86 system. A quick google search returned similar errors when doing that.I would recommend verifying your kernel version (uname -a) and if you have the right one, just remove it and re install it. Perhaps something got corrupt during the download process.
Thank you for your post. this save me a lot of time.
its working great but i have one problem. after shutdown cluster via “ndb-mgm -e shutdown” and restart the cluster servers, databases early created loss all tables. mysql logs won’t show anything. can you help me? thanks again.