
In the previous post I went through how to configure NVMe adapters in PCIe slots to bifurcation, to enable them to be used as individual drives in your virtualization host of choice. In this post, I’ll go through how to enable the drives as pass-through in VMware to use them as Minio disk storage. If you want, you can do the same with Truenas to create a ZFS disk.
Dell Poweredge R730xd with Asus Hyper NVMe Adapter – Null Byte (null-byte.org)
VMware Passthrough
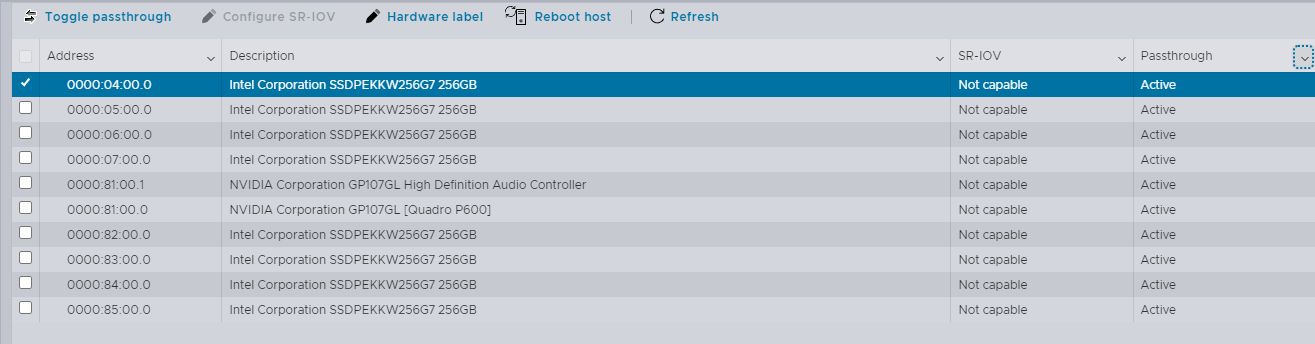
In VMware, you need to enable PCI device passthrough to be able to attach the drives to a single virtual machine. Alternatively you can use the disks as VMware VMFS datastores, without redundancy.
To enable passthrough, open up your ESXi hosts GUI (https://my.vphere.host) and go to Host -> Manage -> Hardware. From here, you can see a list of PCIe devices, regardless if they are passthrough capable or not. Select your drives and press toggle passthrough.
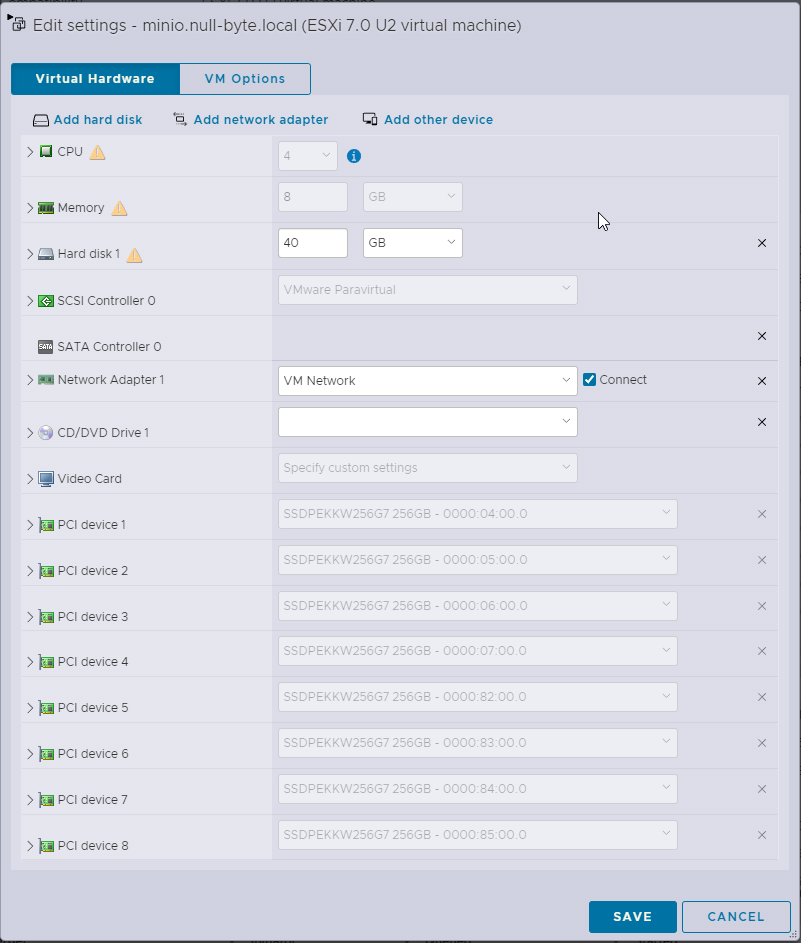
Once the drives are active, you can add them to your virtual machine of choice as PCI devices. Open up the Virtual Machine edit settings page. Note that once you have PCI devices attached to your virtual machine, you lose the capability to do snapshots of the VM while it’s powered on. You can still make modifications with snapshots, but only the create/remove action is available while the VM is powered off. In addition, the VM memory allocation is changed to reserved.
RHEL Minio Configuration
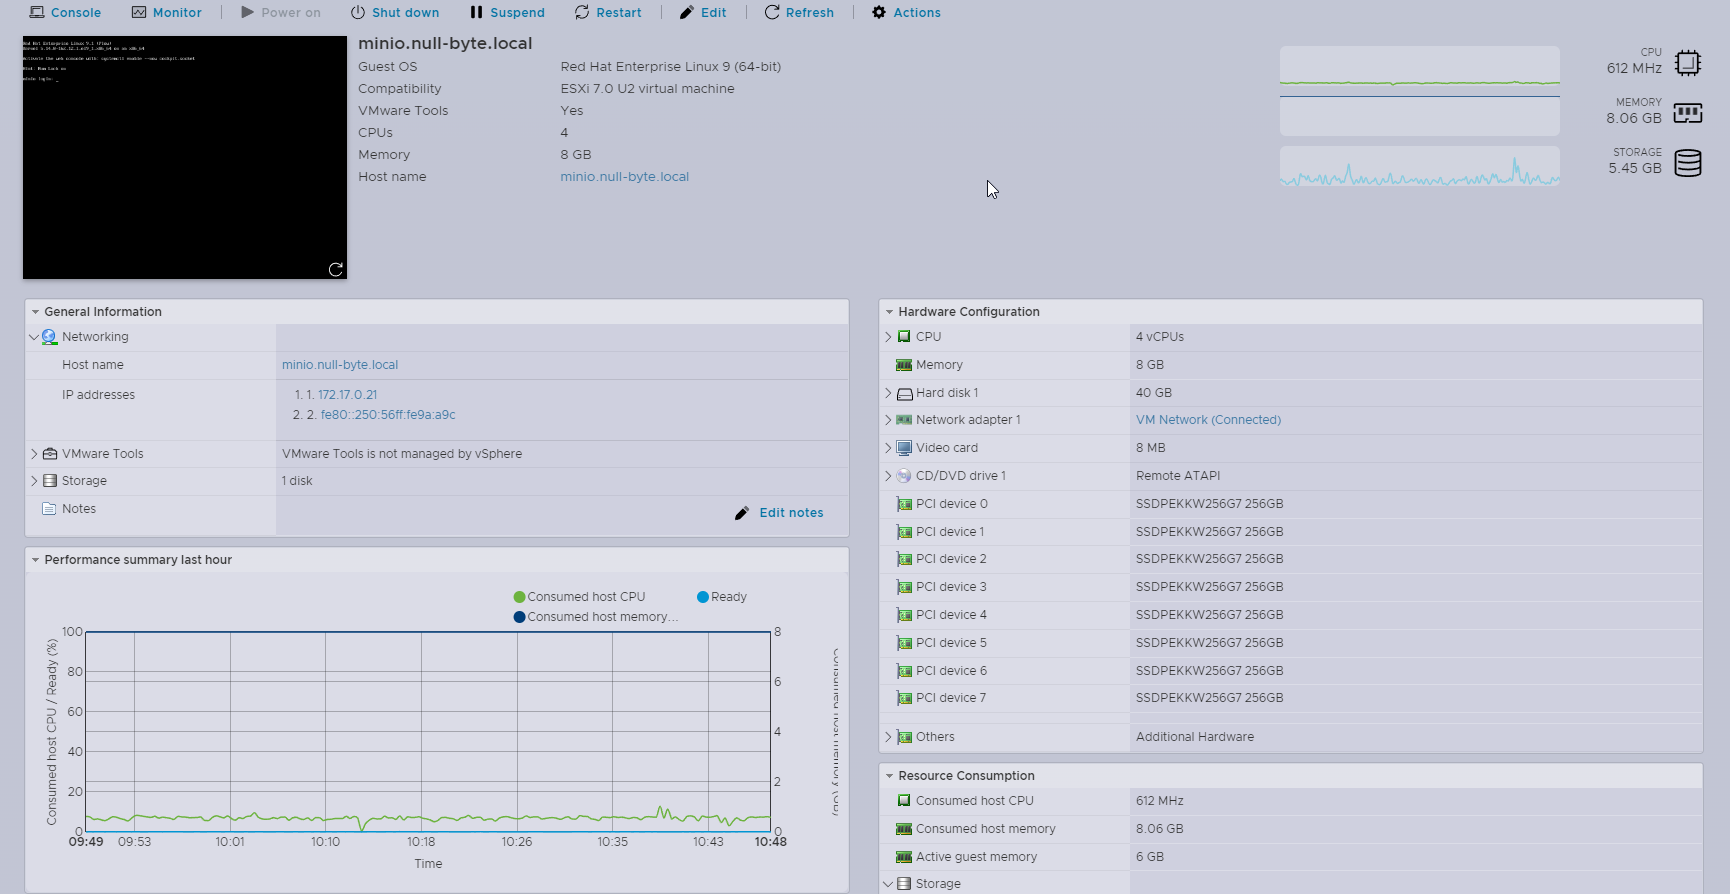
I’ve chosen Red Hat Enterprise Linux 9 for my Minio deployment. You can deploy Minio in multiple different configuration, in this example it’s going to be a single node multi-drive deployment. You can read more about the deployment options in the official Minio documentation (Also use it as reference if something isn’t clear).
Install and Deploy MinIO — MinIO Object Storage for Linux
Let’s start off with creating mount points for the disks and clearing any partitions from the disks;
[root@minio ~]# mkdir /mnt/nvme{1..8}

[root@minio ~]# fdisk /dev/nvme0n1
[root@minio ~]# fdisk /dev/nvme0n1
[root@minio ~]# fdisk /dev/nvme1n1
....
[root@minio ~]# fdisk /dev/nvme7n1
[root@minio ~]# fdisk /dev/nvme8n1
Once you have the disks ready, create XFS filesystem on the disks and add them to fstab for automatic mount. Verify your disks have been mounted properly with df -h.
[root@minio ~]#  mkfs.xfs /dev/nvme0n1 -f -L nvme0
[root@minio ~]#  mkfs.xfs /dev/nvme1n1 -f -L nvme1
[root@minio ~]#  mkfs.xfs /dev/nvme2n1 -f -L nvme2
[root@minio ~]#  mkfs.xfs /dev/nvme3n1 -f -L nvme3
[root@minio ~]#  mkfs.xfs /dev/nvme4n1 -f -L nvme4
[root@minio ~]#  mkfs.xfs /dev/nvme5n1 -f -L nvme5
[root@minio ~]#  mkfs.xfs /dev/nvme6n1 -f -L nvme6
[root@minio ~]#  mkfs.xfs /dev/nvme7n1 -f -L nvme7
[root@minio ~]# cat /etc/fstab
#
# /etc/fstab
# Created by anaconda on Sat Nov 19 19:01:11 2022
#
# Accessible filesystems, by reference, are maintained under '/dev/disk/'.
# See man pages fstab(5), findfs(8), mount(8) and/or blkid(8) for more info.
#
# After editing this file, run 'systemctl daemon-reload' to update systemd
# units generated from this file.
#
/dev/mapper/rhel-root / xfs defaults 0 0
UUID=6766a602-30ee-42c2-8e55-81e4f1228468 /boot xfs defaults 0 0
UUID=7F0C-7904 /boot/efi vfat umask=0077,shortname=winnt 0 2
/dev/mapper/rhel-swap none swap defaults 0 0
# <file system> <mount point> <type> <options> <dump> <pass>
LABEL=nvme0 /mnt/nvme0 xfs defaults,noatime 0 2
LABEL=nvme1 /mnt/nvme1 xfs defaults,noatime 0 2
LABEL=nvme2 /mnt/nvme2 xfs defaults,noatime 0 2
LABEL=nvme3 /mnt/nvme3 xfs defaults,noatime 0 2
LABEL=nvme4 /mnt/nvme4 xfs defaults,noatime 0 2
LABEL=nvme5 /mnt/nvme5 xfs defaults,noatime 0 2
LABEL=nvme6 /mnt/nvme6 xfs defaults,noatime 0 2
LABEL=nvme7 /mnt/nvme7 xfs defaults,noatime 0 2
[root@minio ~]# mount -a
[root@minio ~]# df -h
Filesystem Size Used Avail Use% Mounted on
devtmpfs 4.0M 0 4.0M 0% /dev
tmpfs 3.8G 0 3.8G 0% /dev/shm
tmpfs 1.6G 36M 1.5G 3% /run
/dev/mapper/rhel-root 35G 2.3G 33G 7% /
/dev/sda2 1014M 379M 636M 38% /boot
/dev/nvme0n1 239G 0 239G 0% /mnt/nvme0
/dev/nvme1n1 239G 0 239G 0% /mnt/nvme1
/dev/nvme7n1 239G 0 239G 0% /mnt/nvme7
/dev/nvme6n1 239G 0 239G 0% /mnt/nvme6
/dev/nvme2n1 239G 0 239G 0% /mnt/nvme2
/dev/nvme3n1 239G 0 239G 0% /mnt/nvme3
/dev/nvme5n1 239G 0 239G 0% /mnt/nvme5
/dev/nvme4n1 239G 0 239G 0% /mnt/nvme4
/dev/sda1 599M 7.0M 592M 2% /boot/efi
tmpfs 769M 0 769M 0% /run/user/0
Create the Minio user and group, and change the ownership of the mount points to the user and group;
[root@minio ~]#  groupadd -r minio-user
[root@minio ~]#  useradd -M -r -g minio-user minio-user
[root@minio ~]#  chown minio-user:minio-user /mnt/nvme*
Install the Minio RPM package, and make sure you have the systemd configuration file;
[root@minio ~]#  wget https://dl.min.io/server/minio/release/linux-amd64/archive/minio-20230222182345.0.0.x86_64.rpm -O minio.rpm
[root@minio ~]#  dnf install minio.rpm
[root@minio ~]# cat /etc/systemd/system/minio.service
Create the default Minio configuration file to mount the disks
[root@minio ~]# cat /etc/default/minio
# MINIO_ROOT_USER and MINIO_ROOT_PASSWORD sets the root account for the MinIO server.
# This user has unrestricted permissions to perform S3 and administrative API operations on any resource in the deployment.
# Omit to use the default values 'minioadmin:minioadmin'.
# MinIO recommends setting non-default values as a best practice, regardless of environment.

MINIO_ROOT_USER=admin
MINIO_ROOT_PASSWORD=your-password-here

# MINIO_VOLUMES sets the storage volumes or paths to use for the MinIO server.
# The specified path uses MinIO expansion notation to denote a sequential series of drives between 1 and 4, inclusive.
# All drives or paths included in the expanded drive list must exist *and* be empty or freshly formatted for MinIO to start successfully.

MINIO_VOLUMES="/mnt/nvme{0...7}"

# MINIO_SERVER_URL sets the hostname of the local machine for use with the MinIO Server.
# MinIO assumes your network control plane can correctly resolve this hostname to the local machine.

# Uncomment the following line and replace the value with the correct hostname for the local machine.
MINIO_OPTS="-C /etc/minio --address :9000 --console-address :9001 --certs-dir /opt/minio/certs-dir"
MINIO_SERVER_URL="https://minio.null-byte.local:9000"
Note! that I have a custom certificate from my own RootCA located in the /opt/minio/certs-dir. Do not add the line if you don’t have a signed certificate to use.
Start the Minio server with systemctl, and enable it to autostart with the server;
[root@minio ~]#  systemctl enable minio.service
[root@minio ~]#  systemctl restart minio.service
[root@minio ~]#  systemctl status minio.service
Remember to open firewall ports for Minio to be accessible from your network;
[root@minio ~]#  firewall-cmd --add-port=9000/tcp --permanent
[root@minio ~]#  firewall-cmd --add-port=9001/tcp --permanent
[root@minio ~]#  firewall-cmd --reload
[root@minio ~]#  firewall-cmd --list-all
The default erasure coding of Minio with 8 disks is EC:4. This means, that half of the disks are used for parity. As this is a homleab environment, I don’t this kind of protection for my Minio deployment. Therefore I’m going to change my default Erasure Coding to EC:2. You can read more about the Mino erasure coding and the mc admin client from the following links;
- MinIO Admin Client — MinIO Object Storage for Linux (Admin client guide)
- Erasure Coding — MinIO Object Storage for Linux (Erasure Coding manual)
[root@minio ~]# curl https://dl.min.io/client/mc/release/linux-amd64/mc   --create-dirs   -o $HOME/minio-binaries/mc
[root@minio ~]# chmod +x $HOME/minio-binaries/mc
[root@minio ~]# mv $HOME/minio-binaries/mc /usr/sbin/

[root@minio ~]# mc admin config get minio storage_class
[root@minio ~]# mc admin config set minio storage_class standard="EC:2"
[root@minio ~]# mc admin config get minio storage_class
And that’s it. Now you have your local Object Storage with passthrough disks in VMware. I’ve used this for different projects, as well as a backup target with Veeam 12.
Question…did the fans go insane on you? About to try this tomorrow and have never had luck with the disabling 3rd party cooling command in the Idrac.
Just wondering if you did something different
Can’t remember how the fans reacted to adding a non-standard Dell hardware card to the PCIe slot. You can set fan speeds using IPMItool availabe at Dell sites (Example: https://www.dell.com/support/home/fi-fi/drivers/driversdetails?driverid=0992n). If your fans do spin up, I’ve used the following method to manually set the fan speeds;
ipmitool -I lanplus -H 192.168.1.2 -U root -P your-password-here raw 0x30 0x30 0x02 0xff 0x20
The last hex is the percentage, so in the example below fans are set to 20% on your Dell iDRAC located at 192.168.1.2.