
This is a small guide on how to do a migration from an old NT4 physical machine to a VM that will run on ESXi 4.x or newer. Personally I did this from an old Pentium III desktop with two physical disks and two network cards having already NT4 SP6 to a ESXi 5.1 host with vCenter Server 5.1. This should cover all of the steps required to do a P2V migration of NT4 and hopefully will help you do yours. Understandably VMware dropped NT4 support with VMware Converter 4.x, which is as of writing this guide the earliest build supported by VMware. This however doesn’t mean that you can’t use any of the old tools. It’s just going to be a bit more challenging to find them. I’ve made a collection of required files (that I needed) in the end of this article so you won’t have to look them up.
1. Prepare NT4 for VMware converter
To be able to do a conversion of NT4, it needs to have at least Internet Explorer 5 installed. Unfortunately I never found a network installation file of IE5, the earliest i got my hands on was IE6. If you try to download IE6 SP1 from the official microsoft site, your setup will fail once the ~600kb installer starts to download the required installation files with the following error “The download location information is damaged. Please clear your Internet Explorer browser cache and retry.”. At the end of this post you can find IE6 network installation files so that shouldn’t be a problem anymore. If you need to upgrade your NT4 installation, the Service Packs can be found here.
To install VMware Converter 3.0.3 you need Internet Explorer, the agent installs just fine without it. At least in my case I was unable to make a working connection between my laptop and the NT4 VMware Converter Agent, so I had to install the manager as well. VMware Converter 3.0.3 can be found at the end of this post. Once installing the converter, a reboot is required at the end to finalize the agent.
2. Convert the NT4 physical machine
Once you’ve installed VMware Converter on the machine that needs to be converted, start VMware Converter GUI and select the option to Convert Machine.
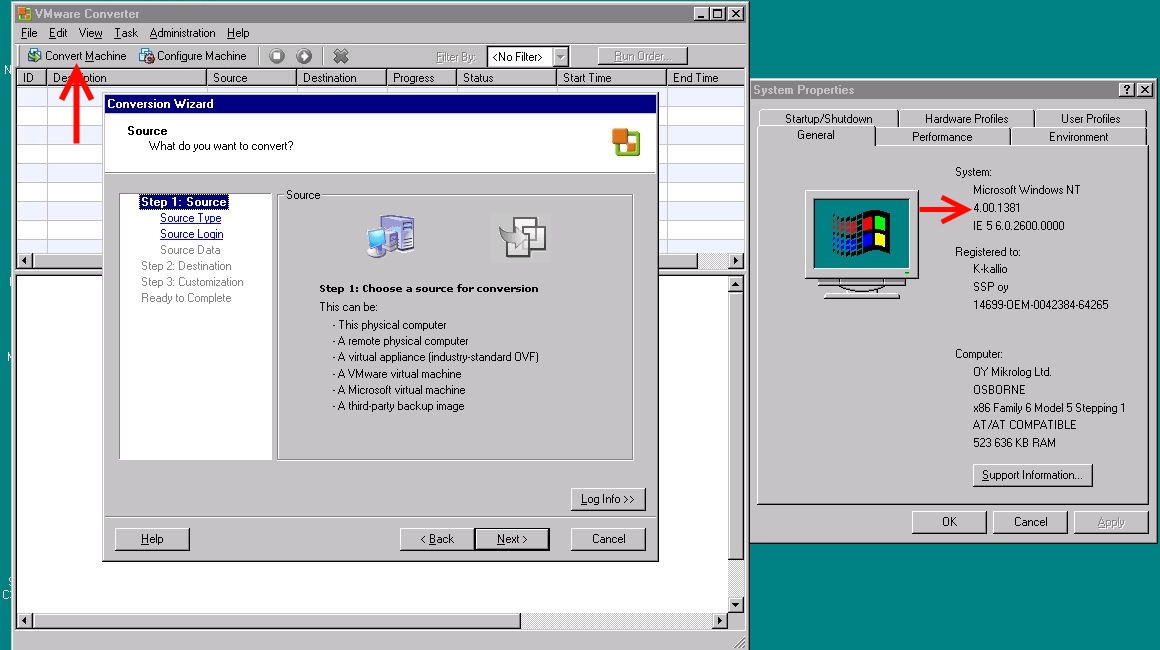
VMware Converter 3-0-3 and WIN NT4
- Source type: Physical Computer
- Physical Machine: This local machine
- Authentication: Your NT4 username/password
- Destination: VMware Workstation or other VMware Virtual Machine
- VMware product: VMware Workstation 6.x
- Name: NT4-xxxxxx (your physical machine name for example)
- Select a location for the virtual machine: you can use a UNC path to your laptop, in example \\nnn.nnn.nnn.nnn\c$ (You need to provide your credentials here)
The converter will now do it’s magic and takes some time to finish. While you are waiting, go have a cup of coffee and watch the progress bar finish.
3. Importing to vCenter 5.x
Once you have a copy of your physical NT4 machine, you can use VMware Workstation to prepare it for it’s final resting place. Add your new VM to VMware Workstation by double clicking on the .vmx file or add it your preferred way. Once you have it in VMware workstation it’s time to check that everything works. Boot the VM up, check that it’s all fine before proceeding (just in case). Network cards won’t work out of the box and we won’t install VMware Tools just yet. Once everything is checked, gracefully shtudown the VM.
Click on File and select “Export to OVF…”, this will make much nicer to import into vCenter server and you don’t need to put it on a datastore first. Once the export to OVF has finished were all set to import into vCenter Server by selecting File -> Deploy OVF Template… option. Navigate to where you stored your NT4 VM and follow the regular import procedure.
4. VMware tools and network adapters
If everything went right in the previous step, you should now see your NT4 VM in vCenter inventory. Before you boot it up, lets make some small changes. Remove your NIC’s and replace them with new ones using the E1000 adapter. Remove the floppy drive (if you don’t need it) and do any other changes that you deem necessary. Power ON the virtual machine and log in once the OS has finished loading. The new network adapters won’t show up yet, as NT4 doesn’t have plug an play. Any drivers also need to be installed. You can install VMware tools at this point, like on any newer operating system. You will get an error where VMXNet3 drivers couldn’t be installed. You can use vmxnet3 if you so desire by installing the drivers later on manually.
Once VMware tools is installed, give the VM a reboot to finish up the installation. E1000 drivers still needs to be installed manually, and for that there’s a KB available on VMware site (here: KB1017903). I’ve added the drivers ready in an ISO file, in case Intel decides to remove them. Follow the installation instruction for PRONT4.EXE and after one last reboot you will be able to get network connectivity and that’s it.
Hopefully you’ve found this guide useful, as most of us still need to convert old NT4 operating systems. It’s a shame VMware decided to drop the support for it. If you have any additions, don’t hesitate to give a commend and ill make changes to this guide. And like with anything this old, Microsoft doesn’t support the OS with any additional security updates so do isolate it as much as possible and try to get rid of it! :)
5. Files
Intel E1000 driver NT4 (source: www.intel.com)

VMware Converter (source: ftp.nju.edu.tw)
Internet Explorer 6 Network Install (source: www.oldapps.com)
Nicely done. Thanks.
the link are dead can place some alternative?
Which one(s) are dead? They all seemed to work for me. Might be that your browser blocks java/other additional scripts required for the downloads to work.
I have a problem with graphic card driver. because after installation of vmware tools I have error massage and changing resulation is not possible
Please check the VM’s video card memory. This limits available resolutions on the VM.
http://kb.vmware.com/selfservice/microsites/search.do?language=en_US&cmd=displayKC&externalId=1003
I just used this guide to import into ESXi 6.0 . During step 3 of this guide use VMWare Workstation 11 or 12. Once the machine is in Workstation, right click it and go to manage>Change Hardware Compatibility to Workstation 11.x then export to OVF. This will make it compatible for importing into ESXi 6.0
I am unable to download the Service packs for NT. Could you please suggest where we can get those and is there any other process to convert the windows NT to VM?
Unfortunately not :/ If you find a good source let me know and i’ll add it here.
Thanks a lot for the how-to and the download-links.
I found a SP6 install folder on my NT40 machine. Uploaded it here if you want to add it to your links: http://duza.gamefarm.at/WindowsNT4.0sp6.zip (but it’s german only i think :( )
Thanks for the great info. Found this site that has the service packs and patches for NT4 in several languages, even the Windows NT 4.0 USB Support Patch.
https://winworldpc.com/product/windows-nt-40/patches